|
Hello
in this tutorial you will be learning how to make this simple signature
in just a few steps: 1) Open a new image any size is fine. I used 500x429. 2) Fill the original layer with black. On the same layer apply Filter<render<lens flare. Brightness 100. 50-300mm zoom. Apply 4 of them as seen in the image below.
3) Next,
on the same layer apply Filter<Sketch<Chrome Settings: 4) Duplicate
this layer and apply a filter<blur<radial Blur on the new layer.
Zoom amount=50 5) Yes
it looks wierd, but be patient! Save the image below onto your computer
and open it into photoshop. Once you have it open, press ctrl+a and
it should select the whole image. Press control+c and go back into
the image we were working on before. Press control V. Now move this
layer so it completely cover image and set the mode to overlay.! 6) Next
go to your layers pallette and press the eye next to your original
layer (the chrome one without radial blur applied)
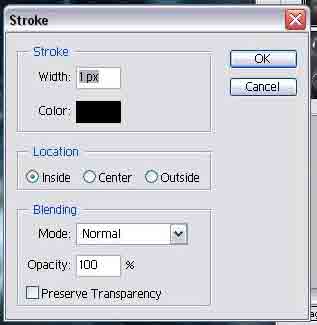
7)Last but not least, lets make it into a signature. Crop the image down to a size you want it. NOTE: Select the best part of your image that you like the most! 8) create a new layer. THis layer we will make a border. Press control+a and go edit<stroke and apply with these settings:
|
||